指定模型
Tensorflow Object Detection API 提供了許多種不同的模型,每個模型各有優缺點,Speed 是辨識的速度,而 COCO mAP 則代表準確度,入門範例中使用的 ssd_mobilenet_v1_coco 模型是速度最快的,但是準確度也是最差的,這種模型適合用在即時(real time)的應用。如果比較在意準確度而不在意速度的話,就可以考慮其它模型。
在這個範例中,我們可以透過 MODEL_NAME 來指定模型,這裡示範換成準確度比較高的 Faster RCNN + NAS(Neural Architecture Search)模型:
# 使用 Faster RCNN + NAS 模型
MODEL_NAME = 'faster_rcnn_nas_coco_2017_11_08'
MODEL_FILE = MODEL_NAME + '.tar.gz'
DOWNLOAD_BASE = 'http://download.tensorflow.org/models/object_detection/'
以下是用 Faster RCNN + NAS 模型所跑出來的結果:

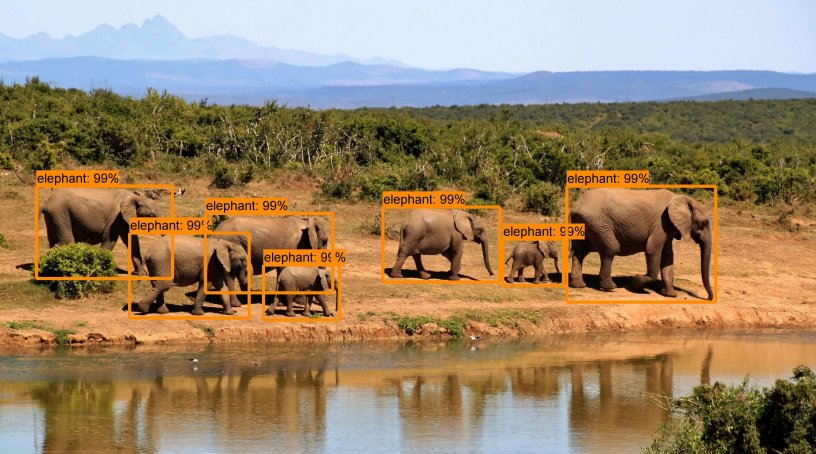
Faster RCNN + NAS 模型測試結果

Faster RCNN + NAS 模型測試結果

Faster RCNN + NAS 模型測試結果

Faster RCNN + NAS 模型測試結果

Faster RCNN + NAS 模型測試結果
換成 Faster RCNN + NAS 模型之後,大部分的結果都很不錯,只差小獅子會被誤判成貓與狗,不過感覺起來準確度是可以接受的。
影片與網路攝影機的物件辨識
以上的應用都是拿靜態的圖片進行物件辨識,接下來我們要示範如何從影片或即時的網路攝影機取得影像,靠著 Tensorflow Object Detection API 辨識出串流影片中的物件,並產生有物件標註的影片檔。
首先將上面的範例儲存成一般的 Python 指令稿,然後參考 OpenCV 擷取網路攝影機串流影像的技巧,將這個範例中的輸入影像替換為攝影機的影像,讓每個串流影格經過 Tensorflow Object Detection API 物件辨識處理後,再即時顯示在 OpenCV 的視窗中。
完整個範例程式碼如下:
import numpy as np
import os
import six.moves.urllib as urllib
import sys
import tarfile
import tensorflow as tf
import zipfile
import scipy.misc

# 加入 OpenCV 模組
import cv2

from collections import defaultdict
from io import StringIO
from matplotlib import pyplot as plt
from PIL import Image

if tf.__version__ != '1.4.0':
  raise ImportError('Please upgrade your tensorflow installation to v1.4.0!')

# 建立 VideoCapture 物件
cap = cv2.VideoCapture(1)

# 設定擷取的畫面解析度
cap.set(cv2.CAP_PROP_FRAME_WIDTH, 960)
cap.set(cv2.CAP_PROP_FRAME_HEIGHT, 480)

sys.path.append("..")

from utils import label_map_util
from utils import visualization_utils as vis_util

MODEL_NAME = 'ssd_mobilenet_v1_coco_2017_11_17'
MODEL_FILE = MODEL_NAME + '.tar.gz'
DOWNLOAD_BASE = 'http://download.tensorflow.org/models/object_detection/'
PATH_TO_CKPT = MODEL_NAME + '/frozen_inference_graph.pb'
PATH_TO_LABELS = os.path.join('data', 'mscoco_label_map.pbtxt')
NUM_CLASSES = 90

opener = urllib.request.URLopener()
opener.retrieve(DOWNLOAD_BASE + MODEL_FILE, MODEL_FILE)
tar_file = tarfile.open(MODEL_FILE)
for file in tar_file.getmembers():
  file_name = os.path.basename(file.name)
  if 'frozen_inference_graph.pb' in file_name:
    tar_file.extract(file, os.getcwd())

detection_graph = tf.Graph()
with detection_graph.as_default():
  od_graph_def = tf.GraphDef()
  with tf.gfile.GFile(PATH_TO_CKPT, 'rb') as fid:
    serialized_graph = fid.read()
    od_graph_def.ParseFromString(serialized_graph)
    tf.import_graph_def(od_graph_def, name='')

label_map = label_map_util.load_labelmap(PATH_TO_LABELS)
categories = label_map_util.convert_label_map_to_categories(label_map, max_num_classes=NUM_CLASSES, use_display_name=True)
category_index = label_map_util.create_category_index(categories)

def load_image_into_numpy_array(image):
  (im_width, im_height) = image.size
  return np.array(image.getdata()).reshape(
      (im_height, im_width, 3)).astype(np.uint8)

with detection_graph.as_default():
  with tf.Session(graph=detection_graph) as sess:
    # 使用無窮迴圈,持續擷取網路攝影機影像
    while True:
      # 讀取一個影格
      ret, image_np = cap.read()

      image_tensor = detection_graph.get_tensor_by_name('image_tensor:0')
      detection_boxes = detection_graph.get_tensor_by_name('detection_boxes:0')
      detection_scores = detection_graph.get_tensor_by_name('detection_scores:0')
      detection_classes = detection_graph.get_tensor_by_name('detection_classes:0')
      num_detections = detection_graph.get_tensor_by_name('num_detections:0')
      image_np_expanded = np.expand_dims(image_np, axis=0)

      (boxes, scores, classes, num) = sess.run(
          [detection_boxes, detection_scores, detection_classes, num_detections],
          feed_dict={image_tensor: image_np_expanded})

      vis_util.visualize_boxes_and_labels_on_image_array(
          image_np,
          np.squeeze(boxes),
          np.squeeze(classes).astype(np.int32),
          np.squeeze(scores),
          category_index,
          use_normalized_coordinates=True,
          line_thickness=4)
      # 以 OpenCV 視窗即時顯示辨識結果
      cv2.imshow('object detection', image_np)
      if cv2.waitKey(25) & 0xFF == ord('q'):
        cv2.destroyAllWindows()
        break
執行之後,就可以從網路攝影機擷取串流的影像,即時產生辨識的結果。

網路攝影機物件辨識
這是我將每個影格辨識的結果輸出成影片的樣子。
在這種即時性的應用,就比較適合使用 SSD + Mobilenet 這類運算比較快的模型,若使用 Faster RCNN + NAS 這種比較慢的模型,每個畫面運算就要等比較久。
除了即時擷取網路攝影機的影像之外,也可以從影片檔案讀取畫面來進行物件辨識,我拿之前用樹莓派拍攝的縮時攝影來測試,以下是測試結果:
繼續閱讀: 12
nick
請問有更改圖片路徑的範例嗎?
PATH_TO_TEST_IMAGES_DIR = ‘test_images’
TEST_IMAGE_PATHS = [ os.path.join(PATH_TO_TEST_IMAGES_DIR, ‘image{}.jpg’.format(i)) for i in range(1, 2) ]
這兩行如何更改
104
object_detection資料夾裡面
test_images的資料夾 裡面有照片
劉柏廷
不好意思,我想執行攝像頭的物件辨識,但出現這樣的錯誤?
想請問該如何解決,謝謝!
—————————————————————————
TypeError Traceback (most recent call last)
in ()
76 (boxes, scores, classes, num) = sess.run(
77 [detection_boxes, detection_scores, detection_classes, num_detections],
—> 78 feed_dict={image_tensor: image_np_expanded})
79
80 vis_util.visualize_boxes_and_labels_on_image_array(
/usr/local/lib/python3.5/dist-packages/tensorflow/python/client/session.py in run(self, fetches, feed_dict, options, run_metadata)
898 try:
899 result = self._run(None, fetches, feed_dict, options_ptr,
–> 900 run_metadata_ptr)
901 if run_metadata:
902 proto_data = tf_session.TF_GetBuffer(run_metadata_ptr)
/usr/local/lib/python3.5/dist-packages/tensorflow/python/client/session.py in _run(self, handle, fetches, feed_dict, options, run_metadata)
1102 feed_handles[subfeed_t] = subfeed_val
1103 else:
-> 1104 np_val = np.asarray(subfeed_val, dtype=subfeed_dtype)
1105
1106 if (not is_tensor_handle_feed and
/usr/local/lib/python3.5/dist-packages/numpy/core/numeric.py in asarray(a, dtype, order)
529
530 “””
–> 531 return array(a, dtype, copy=False, order=order)
532
533
TypeError: int() argument must be a string, a bytes-like object or a number, not ‘NoneType’
noe
請問那個mark上面的字要如何變大呢
因為用jupyter跑 都看不到辨識率是幾趴
謝謝大家
KK
TypeError: int() argument must be a string, a bytes-like object or a number, not ‘NoneType’
怎解決
楊茆世芳
TypeError: int() argument must be a string, a bytes-like object or a number, not ‘NoneType’
是camera解析度不正確或找不到該camera
調整解析度或camera id就可以了