這裡介紹如何使用 TensorFlow 內建的 Keras API 實作手寫數字辨識 CNN 程式。
Keras 是一套高階的深度學習工具,今年 Google 將其納入 TensorFlow 的核心模組當中,發表於 TensorFlow Dev Summit 2017,也就是說未來只要安裝好 TensorFlow 之後,就可以直接使用 Keras 的 API 函數,不需要另外安裝。
TensorFlow 納入 Keras 之後,除了不需要安裝 Keras 就可使用之外,最重要的優點就是可以更容易整合 TensorFlow 與 Keras 兩個架構的程式,比起原本單純的 Keras 架構來說,可以實現更多原本無法做到的事情,例如分散式計算、超參數的調整、TF-Serving 等。
TensorFlow 核心內的 Keras 一開始放在 tf.contrib.keras,但後來又改到 tf.keras,本文的程式碼是是舊版的,需要再進行修正。
以下是我把上一個以 Keras 實作手寫數字辨識 CNN 程式,改為 TensorFlow 內建 Keras 版本的程式碼。
import tensorflow as tf

# 影像的類別數目
num_classes = 10

# 輸入的手寫影像解析度
img_rows, img_cols = 28, 28

# 載入資料(將資料打散,放入 train 與 test 資料集)
(x_train, y_train), (x_test, y_test) = tf.contrib.keras.datasets.mnist.load_data()

# 將原始資料轉為正確的影像排列方式
x_train = x_train.reshape(x_train.shape[], img_rows, img_cols, 1)
x_test = x_test.reshape(x_test.shape[], img_rows, img_cols, 1)

# 輸入資料的維度
input_shape = (img_rows, img_cols, 1)

# 標準化輸入資料
x_train = x_train.astype('float32')
x_test = x_test.astype('float32')
x_train /= 255
x_test /= 255

print('x_train shape:', x_train.shape)
print(x_train.shape[], 'train samples')
print(x_test.shape[], 'test samples')

# 將數字轉為 One-hot 向量
y_train = tf.contrib.keras.utils.to_categorical(y_train, num_classes)
y_test = tf.contrib.keras.utils.to_categorical(y_test, num_classes)

# 建立模型
model = tf.contrib.keras.models.Sequential()

# 加入 2D 的 Convolution Layer,接著一層 ReLU 的 Activation 函數
model.add(tf.contrib.keras.layers.Conv2D(32, kernel_size=(3, 3),
                 activation='relu',
                 input_shape=input_shape))

# 第二層 2D 的 Convolution Layer
model.add(tf.contrib.keras.layers.Conv2D(64, (3, 3), activation='relu'))

# 2D 的 Max-Pooling Layer
model.add(tf.contrib.keras.layers.MaxPooling2D(pool_size=(2, 2)))

# Dropout Layer
model.add(tf.contrib.keras.layers.Dropout(0.25))

# 將 2D 影像轉為 1D 向量
model.add(tf.contrib.keras.layers.Flatten())

# 連接 Fully Connected Layer,接著一層 ReLU 的 Activation 函數
model.add(tf.contrib.keras.layers.Dense(128, activation='relu'))

# Dropout Layer
model.add(tf.contrib.keras.layers.Dropout(0.5))

# 連接 Fully Connected Layer,接著一層 Softmax 的 Activation 函數
model.add(tf.contrib.keras.layers.Dense(num_classes, activation='softmax'))

# 設定模型的 Loss 函數、Optimizer 以及用來判斷模型好壞的依據(metrics)
model.compile(loss=tf.contrib.keras.losses.categorical_crossentropy,
              optimizer=tf.contrib.keras.optimizers.Adadelta(),
              metrics=['accuracy'])

# 訓練模型
model.fit(x_train, y_train,
          batch_size=128 * 2,
          epochs=12,
          verbose=1,
          validation_data=(x_test, y_test))

# 驗證模型
score = model.evaluate(x_test, y_test, verbose=)

# 輸出結果
print('Test loss:', score[])
print('Test accuracy:', score[1])
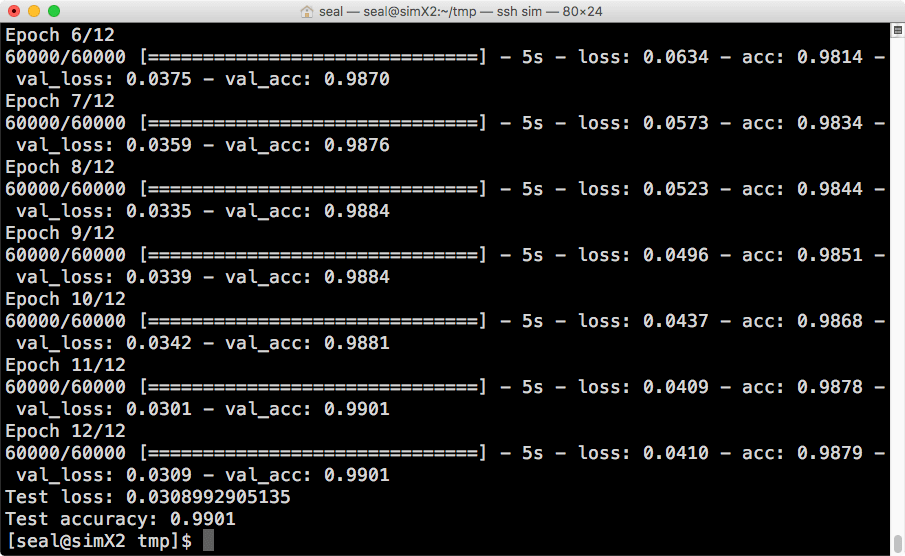
執行的結果跟原來的 Keras 版本一樣。