在 StockWatcher:Google Web Toolkit(GWT) 入門 (二) 中已經將所有的使用者介面元件建立好了,接下來要建立元件的 event,讓這些原件可以有一些動作。
處理客戶端的 Event
加入 Event Handler
在 GWT 中所使用的 event handler interface model 與其他的語言類似,要處理 Add 與 Remove 按鈕的 event,可以使用 ClickHandler,這裡我們使用匿名的類別來實做 ClickHandler,另外加入 KeyPressHandler,在按下 Enter 鍵時可以送出輸入的內容。
package com.google.gwt.sample.stockwatcher.client;

import com.google.gwt.core.client.EntryPoint;
import com.google.gwt.event.dom.client.ClickEvent;
import com.google.gwt.event.dom.client.ClickHandler;
import com.google.gwt.event.dom.client.KeyCodes;
import com.google.gwt.event.dom.client.KeyPressEvent;
import com.google.gwt.event.dom.client.KeyPressHandler;
import com.google.gwt.user.client.Window;
import com.google.gwt.user.client.ui.Button;
import com.google.gwt.user.client.ui.FlexTable;
import com.google.gwt.user.client.ui.HorizontalPanel;
import com.google.gwt.user.client.ui.Label;
import com.google.gwt.user.client.ui.RootPanel;
import com.google.gwt.user.client.ui.TextBox;
import com.google.gwt.user.client.ui.VerticalPanel;

public class StockWatcher implements EntryPoint {

 private VerticalPanel mainPanel = new VerticalPanel();
 private FlexTable stocksFlexTable = new FlexTable();
 private HorizontalPanel addPanel = new HorizontalPanel();
 private TextBox newSymbolTextBox = new TextBox();
 private Button addStockButton = new Button("Add");
 private Label lastUpdatedLabel = new Label();

 /**
  * Entry point method.
  */
 public void onModuleLoad() {
  // Create table for stock data.
  stocksFlexTable.setText(0, 0, "Symbol");
  stocksFlexTable.setText(0, 1, "Price");
  stocksFlexTable.setText(0, 2, "Change");
  stocksFlexTable.setText(0, 3, "Remove");

  // Assemble Add Stock panel.
  addPanel.add(newSymbolTextBox);
  addPanel.add(addStockButton);

  // Assemble Main panel.
  mainPanel.add(stocksFlexTable);
  mainPanel.add(addPanel);
  mainPanel.add(lastUpdatedLabel);

  // Associate the Main panel with the HTML host page.
  RootPanel.get("stockList").add(mainPanel);

  // Move cursor focus to the input box.
  newSymbolTextBox.setFocus(true);
  // Listen for mouse events on the Add button.
  addStockButton.addClickHandler(new ClickHandler() {
   public void onClick(ClickEvent event) {
    addStock();
   }
  });

  // Listen for keyboard events in the input box.
  newSymbolTextBox.addKeyPressHandler(new KeyPressHandler() {
   public void onKeyPress(KeyPressEvent event) {
    if (event.getCharCode() == KeyCodes.KEY_ENTER) {
     addStock();
    }
   }
  });

 }

 /**
  * Add stock to FlexTable. Executed when the user clicks the addStockButton
  * or presses enter in the newSymbolTextBox.
  */
 private void addStock() {
  final String symbol = newSymbolTextBox.getText().toUpperCase().trim();
  newSymbolTextBox.setFocus(true);

  // Stock code must be between 1 and 10 chars that are numbers, letters,
  // or dots.
  if (!symbol.matches("^[0-9A-Z.]{1,10}$")) {
   Window.alert("'" + symbol + "' is not a valid symbol.");
   newSymbolTextBox.selectAll();
   return;
  }

  newSymbolTextBox.setText("");

  // TODO Don't add the stock if it's already in the table.
  // TODO Add the stock to the table.
  // TODO Add a button to remove this stock from the table.
  // TODO Get the stock price.

 }

}
從 49 行到 56 行是將 addStockButton 加入一個 ClickHandler,當 Add 按鈕被按下時,就會呼叫 addStock() 函數,而從 58 行到 65 行也是類似的做作用,當使用者按下 Enter 鍵時,則會呼叫 addStock() 函數。
從 69 行到 92 行是新定義的 addStock() 函數,在使用者輸入資料後,會檢查資料是否正確。
從第 4 行到第 9 行是新增的 import,通常使用 Eclipse 會提示你該新增哪一些。
這裡我們使用匿名的類別來新增 Event Handler,這是因為這個 Event Handler 很簡單,若是較複雜的 Event Handler 則使用一般的方式定義類別會比較好。
測試 Event Handler
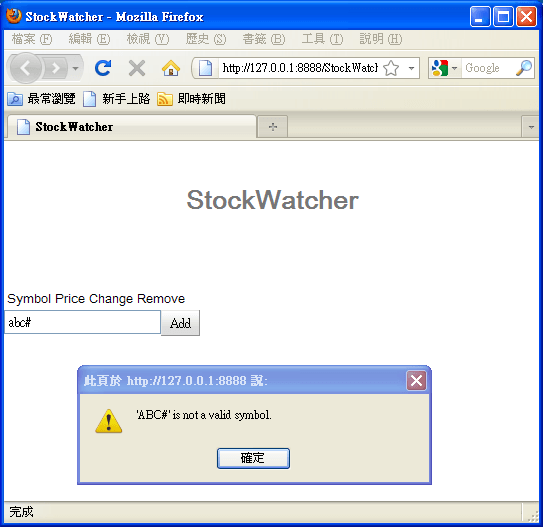
將程式存檔後,就可以測試 Event Handler 了,若是輸入不用確的字串,則會出現錯誤的訊息:
客戶端程式碼
接下來要加入在客戶端的程式碼,以便處理一些客戶端的動作:
- 新增或移除 stock 資料。
- 定期更新 stock 資料。
- 顯示上次更新的時間。
新增資料結構
首先新增加一個資料結構,用來儲存使用者所輸入資料,我們直接使用 Java 的 ArrayList:
public class StockWatcher implements EntryPoint {

 private VerticalPanel mainPanel = new VerticalPanel();
 private FlexTable stocksFlexTable = new FlexTable();
 private HorizontalPanel addPanel = new HorizontalPanel();
 private TextBox newSymbolTextBox = new TextBox();
 private Button addStockButton = new Button("Add");
 private Label lastUpdatedLabel = new Label();
 private ArrayList<String> stocks = new ArrayList<String>();
依照 Eclipse 的提示加入必要的 import
import java.util.ArrayList;
在 Flex Table 中加入資料
修改 addStock() 函數。檢查使用者所輸入的資料是否重複:
// TODO Don't add the stock if it's already in the table.
if (stocks.contains(symbol))
  return;
若資料沒有重複,則新增之:
// TODO Add the stock to the table.
int row = stocksFlexTable.getRowCount();
stocks.add(symbol);
stocksFlexTable.setText(row, 0, symbol);
加入刪除 stock 的按鈕:
// TODO Add a button to remove this stock from the table.
Button removeStockButton = new Button("x");
removeStockButton.addClickHandler(new ClickHandler() {
  public void onClick(ClickEvent event) {
    int removedIndex = stocks.indexOf(symbol);
    stocks.remove(removedIndex);
    stocksFlexTable.removeRow(removedIndex + 1);
  }
});
stocksFlexTable.setWidget(row, 3, removeStockButton);
測試新增/移除 Stock
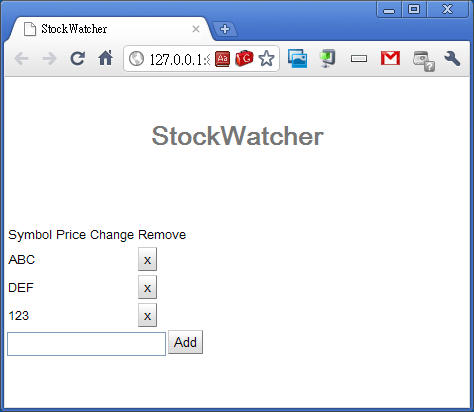
存檔後,測試新增與移除 stock 的功能:
定時更新資料
在傳統的網頁中若需要定時更新網頁中的資料,最常見的方式就是定時重新載入網頁,但這種方式會占用掉大量的資源,在 Web 2.0 的技術中,有更好的方式可以達到這樣的效果。
GWT 中提供了 Timer 類別可以處理這種定時更新的需求,Timer 是一個單執行緒、跨瀏覽器的類別,它可以讓你在設定的時間點執行某一段程式。
// Move cursor focus to the text box.
newSymbolTextBox.setFocus(true);

// Setup timer to refresh list automatically.
Timer refreshTimer = new Timer() {
  @Override
  public void run() {
    refreshWatchList();
  }
};
refreshTimer.scheduleRepeating(REFRESH_INTERVAL);
依照 Eclipse 的提示加入 import
import com.google.gwt.user.client.Timer;
定義 REFRESH_INTERVAL,設定多久更新一次
public class StockWatcher implements EntryPoint {

  private static final int REFRESH_INTERVAL = 5000; // ms
  private VerticalPanel mainPanel = new VerticalPanel();
在 addStock() 函數的結尾加上下面這行
// TODO Get the stock price.
refreshWatchList();
最後在 StockWatcher 類別中加入一個方法:
private void refreshWatchList() {
  // TODO Auto-generated method stub
}
當 Timer 啟動時,它會去執行 run() 函數,這裡我們直接讓他呼叫 refreshWatchList() 函數,接下來我們要實做 refreshWatchList() 函數。
包裝 Stock 資料
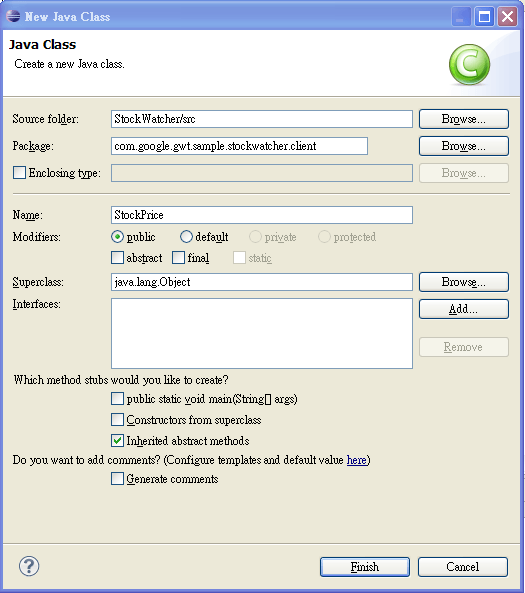
使用 GWT 可以加速往頁開發的原因在於其可以使用 Java 的方式開發,這裡我們使用一個類別來實做 stock 的資料,首先新增一個 Java 的類別,首先在 Eclipse 選擇 com.google.gwt.sample.stockwatcher.client,然後在選單列中選擇 File > New > Class:
填入 Class 的名稱:StockPrice,剩下的使用預設的選項,按下 Finish。建立好了 StockPrice 類別之後,要撰寫其內部的程式碼,這是一個基本的類別,實作方式很簡單:
package com.google.gwt.sample.stockwatcher.client;

public class StockPrice {

  private String symbol;
  private double price;
  private double change;

  public StockPrice() {
  }

  public StockPrice(String symbol, double price, double change) {
    this.symbol = symbol;
    this.price = price;
    this.change = change;
  }

  public String getSymbol() {
    return this.symbol;
  }

  public double getPrice() {
    return this.price;
  }

  public double getChange() {
    return this.change;
  }

  public double getChangePercent() {
    return 10.0 * this.change / this.price;
  }

  public void setSymbol(String symbol) {
    this.symbol = symbol;
  }

  public void setPrice(double price) {
    this.price = price;
  }

  public void setChange(double change) {
    this.change = change;
  }
}
接下來我們使用隨機的亂數指定 stock 的資料,以實做 refreshWatchList():
private void refreshWatchList() {
  final double MAX_PRICE = 100.0; // $100.00
  final double MAX_PRICE_CHANGE = 0.02; // +/- 2%

  StockPrice[] prices = new StockPrice[stocks.size()];
  for (int i = 0; i < stocks.size(); i++) {
    double price = Random.nextDouble() * MAX_PRICE;
    double change = price * MAX_PRICE_CHANGE
        * (Random.nextDouble() * 2.0 - 1.0);

    prices[i] = new StockPrice(stocks.get(i), price, change);
  }

  updateTable(prices);
}
再加上必要的 import
import com.google.gwt.user.client.Random;
在 StockWatcher 類別中加入一個 updateTable 方法,這個將用來更新 Flex Table 的內容:
private void updateTable(StockPrice[] prices) {
  for (int i = 0; i < prices.length; i++) {
    updateTable(prices[i]);
  }

  // Display timestamp showing last refresh.
  lastUpdatedLabel.setText("Last update : "
      + DateTimeFormat.getMediumDateTimeFormat().format(new Date()));
}
private void updateTable(StockPrice price) {
  // Make sure the stock is still in the stock table.
  if (!stocks.contains(price.getSymbol())) {
    return;
  }

  int row = stocks.indexOf(price.getSymbol()) + 1;

  // Format the data in the Price and Change fields.
  String priceText = NumberFormat.getFormat("#,##0.00").format(
      price.getPrice());
  NumberFormat changeFormat = NumberFormat.getFormat("+#,##0.00;-#,##0.00");
  String changeText = changeFormat.format(price.getChange());
  String changePercentText = changeFormat.format(price.getChangePercent());

  // Populate the Price and Change fields with new data.
  stocksFlexTable.setText(row, 1, priceText);
  stocksFlexTable.setText(row, 2, changeText + " (" + changePercentText
      + "%)");
}
加入必要的 import
import com.google.gwt.i18n.client.NumberFormat;
import com.google.gwt.i18n.client.DateTimeFormat;
import java.util.Date;
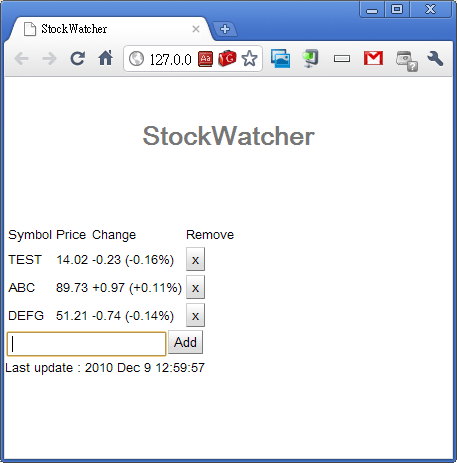
最後存檔測試:
這樣基本的程式部分就大功告成了!


