
這篇是我的個人筆記,介紹 Ext JS 的應用程式架構,這是使用 Ext JS 開發應用程式前所必備的基礎觀念。
Ext JS 提供了 MVC 與 MVVM 兩種應用程式架構,可將整個應用程式分割為幾個部分,讓程式的邏輯與使用者介面可以互相獨立,降低彼此的干擾與相依性,讓整個程式碼架構更乾淨、更容易開發與維護。
以下的教學會介紹這兩種架構的基本概念,以及如何用這樣的架構建立一個應用程式。
MVC 是什麼?
MVC 是 Model–view–controller 的縮寫,這個架構將大部份主要的類別(class)分為 Models、Views 與 Controllers 這三類,Views 是使用者介面,Models 則是 Views 會使用到的資料,而 Controllers 則是負責程式的所有邏輯控制,必要時會對 Views 與 Models 進行操控。
View 與 Model 通常是互相獨立,而且也不會直接互相溝通的,整體性的控制權都是由 Controller 所掌握,View 與 Model 頂多只會包含少量跟自己本身有關的邏輯程式碼,大部份的程式邏輯都會統一放在 Controller 中。
MVC 架構是希望可以清楚定義出每一個類別所負責的工作,進而讓各個類別可以降低耦合性,讓整個應用程式可以更容易被開發與維護,提高程式碼可重複使用性。
MVVM 是什麼?
MVVM 與 MVC 類似,主要的差異在於 MVVM 特別在 View 與 Model 之間加入一層抽象的 ViewModel,這個 ViewModel 藉由 data binding 的技術來自動處理 View 與 Model 之間資料異動與同步問題。
這樣的架構可以讓開發者不需要去自己撰寫許多控制 View 的程式碼,許多使用者介面的問題可由 ViewModel 自動處理。
MVC 與 MVVM
在實際動手開發 Ext JS 程式之前,我們要先把 MVC 與 MVVM 中每個部分具體一點區分清楚,在程式開發時可以較容易遵循:
- Model
- 應用程式中的資料,例如使用者帳號、密碼等,Model 本身知道如何透過 data package 進行資料的儲存,並且也可以跟其他的 Model 互相連結。
Model 通常會跟 Store 一起使用,將資料提供給 grid 這類的組件,另外 Model 也非常適合包含一些資料驗證的程式邏輯。 - View
- 所有在螢幕上可以看的到的圖形使用者介面,例如 grids、trees 與 panels 等。
- Controller
- Controller 是放置整個程式邏輯控制的地方,透過操控 Views 讓整個應用程式可以運作,其中包含 Views 的繪製、路由、建立 Model 實體以及其他各種程式邏輯。
- ViewModel
- ViewModel 負責管理 View 所專屬的資料,他可以透過資料綁定的方式,讓 View 中的資料可以跟外部連結,並且在資料改變時自動同步更新。
在使用 Ext JS 開發時,遵循這樣的架構可以帶來以下的優點:
- 每一個應用程式都使用相同的架構規範,所以程式設計者只需要學一次,就可以一勞永逸。
- 可以很方便的將一個應用程式的程式碼提供給其他的應用程式使用。
- 可以使用 Sencha Cmd 來產生最佳化的應用程式發布版本。
建立應用程式 App
以 Ext JS 來開發應用程式時,會使用到 Sencha Cmd 與 Ext JS SDK 這兩個工具,請先將它們安裝妥當。
接著用 Sencha Cmd 建立基本的應用程式架構:
sencha -sdk local/path/to/ExtJS generate app MyApp MyApp
cd app
sencha app watch
應用程式概略
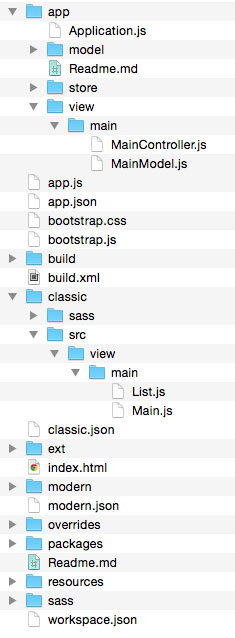
首先我們先看一下 Sencha Cmd 所產生的檔案與目錄結構,所有的 Store、Model、ViewModel 與 ViewController 類別都放在 app 目錄中,而我們也可以將 ViewControllers 與 ViewModels 依照各自的 View 名稱在 app/view/ 下面建立子目錄來存放(例如 app/view/main/ 以及 classic/src/view/main/)。
命名空間(Namespace)
在 Ext JS 中的類別命名空間都是以這樣的規則命名的:
<AppName>.<foldername>.<ClassAndFileName>
簡單來說就是以應用程式的名稱(<AppName>)做開頭,然後中間是一個或多個目錄名稱(<foldername>),最後是類別名稱(<ClassAndFileName>)。
在這個範例中,MyApp 就是 <AppName>,view 與 main 就是 <foldername>,而 Main 就是 <ClassAndFileName>。
在這個規則之下,Ext JS 這個架構會從下面幾個地方尋找 Main.js 這個檔案:
classic/src/view/main/Main.js- classic 版本,適用於一般的桌上型電腦的瀏覽器。
modern/src/view/main/Main.js- modern 版本,適用於手機瀏覽器。
而 MyApp.view.main.MainController 這個同時給所有版本用的檔案(core 版本)則是放在 app/view/main/MainController.js。假設這些檔案沒有放在這裡的話,Ext JS 就會顯示這樣的錯誤訊息:

應用程式
接著來看一下應用程式的 index.html:
<!DOCTYPE HTML>
<html manifest="">
<head>
<meta http-equiv="X-UA-Compatible" content="IE=edge">
<meta charset="UTF-8">

<title>MyApp</title>

<script type="text/javascript">
var Ext = Ext || {}; // Ext namespace won't be defined yet...

// This function is called by the Microloader after it has performed basic
// device detection. The results are provided in the "tags" object. You can
// use these tags here or even add custom tags. These can be used by platform
// filters in your manifest or by platformConfig expressions in your app.
//
Ext.beforeLoad = function (tags) {
  var s = location.search,  // the query string (ex "?foo=1&bar")
    profile;

  // For testing look for "?classic" or "?modern" in the URL to override
  // device detection default.
  //
  if (s.match(/bclassicb/)) {
    profile = 'classic';
  }
  else if (s.match(/bmodernb/)) {
    profile = 'modern';
  }
  else {
    profile = tags.desktop ? 'classic' : 'modern';
    //profile = tags.phone ? 'modern' : 'classic';
  }

  Ext.manifest = profile; // this name must match a build profile name

  // This function is called once the manifest is available but before
  // any data is pulled from it.
  //
  //return function (manifest) {
  // peek at / modify the manifest object
  //};
};
</script>

<!-- The line below must be kept intact for Sencha Cmd to build your application -->
<script id="microloader" type="text/javascript" src="bootstrap.js"></script>

</head>
<body></body>
</html>
Ext JS 是使用 Microloader 來載入 app.json 所列出了各項資源檔,這樣的機制讓所有的資源檔可以集中管理,開發者不必將一堆資源檔加進 index.html 中。
app.json 本身含有大量的註解,參考其中的說明可以幫助開發者了解如何自訂其中的設定。
app.js
上面在建立一個應用程式時,自動建立了一個 Application 類別,然後在 app.js 中建立一個實體,以下是 app.js 的內容:
/*
 * This file is generated and updated by Sencha Cmd. You can edit this file as
 * needed for your application, but these edits will have to be merged by
 * Sencha Cmd when upgrading.
 */
Ext.application({
  name: 'MyApp',

  extend: 'MyApp.Application',

  requires: [
      'MyApp.view.main.Main'
  ],

  // The name of the initial view to create. With the classic toolkit this class
  // will gain a "viewport" plugin if it does not extend Ext.Viewport. With the
  // modern toolkit, the main view will be added to the Viewport.
  //
  mainView: 'MyApp.view.main.Main'

  //-------------------------------------------------------------------------
  // Most customizations should be made to MyApp.Application. If you need to
  // customize this file, doing so below this section reduces the likelihood
  // of merge conflicts when upgrading to new versions of Sencha Cmd.
  //-------------------------------------------------------------------------
});
mainView 參數可以讓我們指定任何的類別作為 Viewport,以這個例子來說,我們指定 MyApp.view.main.Main 作為 Viewport。
mainView 可以用來控制應用程式產生指定的 view 以及掛載 Viewport Plugin。
Application.js
每一個 Ext JS 應用程式都是在 app.js 中建立一個 Application 類別實體開始執行的,另外在測試時期也可以用其他方式建立 Application 的實體。
以下是 Sencha Cmd 自動產生的 Application.js:
Ext.define('MyApp.Application', {
  extend: 'Ext.app.Application',

  name: 'MyApp',

  stores: [
    // TODO: add global / shared stores here
  ],

  launch: function () {
    // TODO - Launch the application
  },

  onAppUpdate: function () {
    Ext.Msg.confirm('Application Update', 'This application has an update, reload?',
      function (choice) {
        if (choice === 'yes') {
          window.location.reload();
        }
      }
    );
  }
});
Application 類別中含有一些應用程式的全域設定,例如命名空間、共享的 stores 等。而 onAppUpdate 這個方法會在應用程式需要更新時被呼叫(也就是瀏覽器的快取版本跟伺服器最新的版本不同的時候),通知使用者重新載入整個應用程式。
Views
View 就是一種 Component(Ext.Component 的子類別),View 裡面包含了所有圖形操作的介面,以下是 classic/src/view/main/Main.js 的內容:
Ext.define('MyApp.view.main.Main', {
  extend: 'Ext.tab.Panel',
  xtype: 'app-main',

  requires: [
    'Ext.plugin.Viewport',
    'Ext.window.MessageBox',

    'MyApp.view.main.MainController',
    'MyApp.view.main.MainModel',
    'MyApp.view.main.List'
  ],

  controller: 'main',
  viewModel: 'main',

  ui: 'navigation',

  tabBarHeaderPosition: 1,
  titleRotation: 0,
  tabRotation: 0,

  header: {
    layout: {
      align: 'stretchmax'
    },
    title: {
      bind: {
        text: '{name}'
      },
      flex: 0
    },
    iconCls: 'fa-th-list'
  },

  tabBar: {
    flex: 1,
    layout: {
      align: 'stretch',
      overflowHandler: 'none'
    }
  },

  responsiveConfig: {
    tall: {
      headerPosition: 'top'
    },
    wide: {
      headerPosition: 'left'
    }
  },

  defaults: {
    bodyPadding: 20,
    tabConfig: {
      plugins: 'responsive',
      responsiveConfig: {
        wide: {
          iconAlign: 'left',
          textAlign: 'left'
        },
        tall: {
          iconAlign: 'top',
          textAlign: 'center',
          width: 120
        }
      }
    }
  },

  items: [{
    title: 'Home',
    iconCls: 'fa-home',
    // The following grid shares a store with the classic version's grid as well!
    items: [{
      xtype: 'mainlist'
    }]
  }, {
    title: 'Users',
    iconCls: 'fa-user',
    bind: {
      html: '{loremIpsum}'
    }
  }, {
    title: 'Groups',
    iconCls: 'fa-users',
    bind: {
      html: '{loremIpsum}'
    }
  }, {
    title: 'Settings',
    iconCls: 'fa-cog',
    bind: {
      html: '{loremIpsum}'
    }
  }]
});
在 view 中不包任何的程式邏輯,所有 view 的邏輯控制都會放在 ViewController 中,以下我們會接著介紹。
另外還有一個 List 這個 view(classic/src/view/main/List.js):
/**
 * This view is an example list of people.
 */
Ext.define('MyApp.view.main.List', {
  extend: 'Ext.grid.Panel',
  xtype: 'mainlist',

  requires: [
    'MyApp.store.Personnel'
  ],

  title: 'Personnel',

  store: {
    type: 'personnel'
  },

  columns: [
    { text: 'Name',  dataIndex: 'name' },
    { text: 'Email', dataIndex: 'email', flex: 1 },
    { text: 'Phone', dataIndex: 'phone', flex: 1 }
  ],

  listeners: {
    select: 'onItemSelected'
  }
});
Controller 設定
controller 可以讓我們設定 view 的 ViewController,當一個 ViewController 被指定為一個 view 的 controller,那麼我們就可以把該 view 的事件 handlers 與各種 references 放在這個 controller 中。
ViewModel 設定
viewModel 可以設定 view 的 ViewModel,ViewModel 可以負責提供 view 所需要的資料,在 ViewModel 中的資料通常都是以資料綁定的方式來給 view 使用。
在 Main 這個 view 的主要 tab panel 中,title 就是用來綁定資料用的,當 ViewModel 中的資料改變時,這裡對應的資料也會改變。
Controllers
主要的 ViewController MainController.js 如下:
Ext.define('MyApp.view.main.MainController', {
  extend: 'Ext.app.ViewController',

  alias: 'controller.main',

  onItemSelected: function (sender, record) {
    Ext.Msg.confirm('Confirm', 'Are you sure?', 'onConfirm', this);
  },

  onConfirm: function (choice) {
    if (choice === 'yes') {
      //
    }
  }
});
在 List.js 有指定一個 select 事件的處理函數 onItemSelected,而這個 onItemSelected 就會對應到其上層 Main.js 的 controller,也就是這裡的 MainController.js,也就是說這裡不需要再做其他設定,這個 onItemSelected 就會負責處理 List.js 的 select 事件。
這樣的架構讓程式設計師可以很方便的加入程式邏輯,因為 controller 與 view 是一對一對應的,我們只要加入 onItemSelected 這個函數就可以了。
當 grid 的 row 被選擇時,會跳出一個確認的訊息視窗,這裡我們使用的 onConfirm 這個函數來取得使用者的回應。
ViewControllers 主要有以下幾個作用:
- 透過 listener 連接 view,讓程式碼好管理。
- 讓 view 可以自動管理 ViewController 的生命週期,每一個 view 會自動建立一個屬於自己的 ViewController 實體,並且在 view destroy 時,對應的 ViewController 也會一起 destroy。
- 讓巢狀結構的 view 更好處理。
ViewModels
這是 app/view/main/MainModel.js 的內容:
Ext.define('MyApp.view.main.MainModel', {
  extend: 'Ext.app.ViewModel',

  alias: 'viewmodel.main',

  data: {
    name: 'MyApp',

    loremIpsum: 'Lorem ipsum dolor sit amet, consectetur adipisicing elit, sed do eiusmod tempor incididunt ut labore et dolore magna aliqua. Ut enim ad minim veniam, quis nostrud exercitation ullamco laboris nisi ut aliquip ex ea commodo consequat. Duis aute irure dolor in reprehenderit in voluptate velit esse cillum dolore eu fugiat nulla pariatur. Excepteur sint occaecat cupidatat non proident, sunt in culpa qui officia deserunt mollit anim id est laborum.'
  }

  //TODO - add data, formulas and/or methods to support your view
});
ViewModel 是用來管理資料物件的,它可以讓 view 綁定需要資料並且在資料變動時同步更新。ViewModel 跟 ViewController 一樣都會由 view 自動控制其實體的建立與 destroy,由於 ViewModel 是跟 view 連接的,所以可以透過繼承的關係,取用父類別的 ViewModel。
在 Main.js 中,我們使用 viewModel 來設定 ViewModel 的連結,這樣可以使 Main.js 取用 MainModel.js 的資料,而這個範例是將資料用 in-line 的方式直接寫在這裡,除此之外我們也可以利用各種其他的方式提供資料,例如 AJAX 與 REST 等。
Models 與 Stores
應用程式中大部分的資料都是透過 Models 與 Stores 來管理的。
Models
Ext.data.Model 用來表示任何需要長期存放的資料,每個 model 都有自己的欄位與函數,提供自己需要的功能。Model 通常都會跟 Store 一同使用,而 Store 則是提供一些需要綁定資料的 view 來使用,像 grid、tree 與 chart 等。
這裏的範例並沒有包含 Model,所以我們來看一小段範例程式碼:
Ext.define('MyApp.model.User', {
  extend: 'Ext.data.Model',
  fields: [
    {name: 'name',  type: 'string'},
    {name: 'age',   type: 'int'}
  ]
});
這個 User.js 根據命名空間的規則,要放在 app/model/ 之下。
Ext.data.Model 使用 fields 來指定資料的欄位,Model 類別中可透過 fields 這個參數宣告 fields,以這裡的例子來說,name 定義一個字串資料(String),而 age 定義一個整數資料(Integer)。除了這些,還有其他的資料型別也可以使用。
您也可以省略 fields,不過明確指定 fields 有一些優點:
- 資料驗證。
- 資料預設值。
- 轉換函數。
Stores
Store 是 client 端的資料快取(cache),提供對資料排序、篩選與查詢等功能。
這裏的範例同樣沒有使用到 Store,我們另外看一段範例程式碼:
Ext.define('MyApp.store.Users', {
  extend: 'Ext.data.Store',
  alias: 'store.users',
  model: 'MyApp.model.User',
  data : [
   {firstName: 'Seth', age: '34'},
   {firstName: 'Scott', age: '72'},
   {firstName: 'Gary', age: '19'},
   {firstName: 'Capybara', age: '208'}
  ]
});
這個 Users.js 依照命名規則應該放在 app/store/。
若需要將這個 Store 設為全域的,可以將這個 Store 加入 Application.js,在 Application.js 加入的方式為:
stores: [
  'Users'
],
這個例子中,Store 直接包含實際的資料,而通常在實際應用上,我們會使用 proxy 的方式來取得資料,更詳細的說明請參考 Data Package。
參考資料:Ext JS Guides
Image Credit:Flickr
Billy
另外還有一個 List 這個 view(classic/src/main/view/List.js) 路徑是不是寫錯了,應該是 classic/src/view/main/List.js
G. T. Wang
抱歉,已經修正。