本文記錄了如何在 Ubuntu Linux 26.04 LTS 環境下,編譯與安裝 Cam2Sim 閉環自動駕駛模擬環境。
下載 Sim2Sim 原始碼
透過 git 下載 Cam2Sim 專案原始程式碼:
# 下載 Cam2Sim 原始程式碼
git clone [email protected]:ast-fortiss-tum/cam2sim.git cam2sim

# 進入 cam2sim 目錄
cd cam2sim
以下所有的安裝與設定過程,都會在 cam2sim 目錄之下進行。
安裝 Miniconda
安裝 Miniconda 環境:
# 下載 Miniconda
curl -O https://repo.anaconda.com/miniconda/Miniconda3-latest-Linux-x86_64.sh

# 安裝 Miniconda
bash Miniconda3-latest-Linux-x86_64.sh
Miniconda 安裝完成後,它會詢問是否將設定寫入 ~/.bashrc 設定檔中,登入時自動載入 Conda 環境,請選擇 yes 讓它自動加入設定。
重新開啟終端機,檢查 Conda 環境是否有自動設定好:
# 檢查 Conda 環境
conda --version
安裝 CARLA 0.9.15
從 CARLA 的 GitHub 下載 0.9.15 版的 CARLA,解壓縮之後自己選一個地方放。
# 將 CARLA 解壓縮之後自己選一個地方放
export CARLA_PATH=/home/gtwang/CARLA/Carla_0.9.15

# 建立 ${CARLA_PATH}
mkdir -p ${CARLA_PATH} && cd ${CARLA_PATH}

# 下載 0.9.15 版的 CARLA
wget -O CARLA_0.9.15.tar.gz https://tiny.carla.org/carla-0-9-15-linux

# 解壓縮
tar zxvf CARLA_0.9.15.tar.gz

# 刪除壓縮檔
rm CARLA_0.9.15.tar.gz
編輯 cam2sim 原始碼中的 3_generate_simulation_data/utils/config.py 檔案,修改 CARLA 的放置路徑:
# 設定 CARLA 安裝路徑
CARLA_INSTALLATION_PATH = "/home/gtwang/CARLA/Carla_0.9.15"
安裝 Nerfstudio
參考 Nerfstudio 官方文件,建立 Nerfstudio 用的 Conda 環境,在此環境中安裝 Nerfstudio:
# 建立 Nerfstudio 的 Conda 環境
conda create --name nerfstudio -y python=3.8
conda activate nerfstudio
python -m pip install --upgrade pip

# 移除舊版套件
pip uninstall torch torchvision functorch tinycudann

# 安裝 PyTorch 2.1.2 搭配 CUDA 11.8
pip install torch==2.1.2+cu118 torchvision==0.16.2+cu118 --extra-index-url https://download.pytorch.org/whl/cu118

# 安裝 cuda-toolkit
conda install -c "nvidia/label/cuda-11.8.0" cuda-toolkit

# 安裝 tiny-cuda-nn
pip install ninja git+https://github.com/NVlabs/tiny-cuda-nn/#subdirectory=bindings/torch
安裝 tiny-cuda-nn 的時候,可能會出現以下錯誤:
/home/gtwang/miniconda3/envs/nerfstudio/include/crt/host_config.h:132:2: error: #error -- unsupported GNU version! gcc versions later than 11 are not supported! The nvcc flag '-allow-unsupported-compiler' can be used to override this version check; however, using an unsupported host compiler may cause compilation failure or incorrect run time execution. Use at your own risk.
        132 | #error -- unsupported GNU version! gcc versions later than 11 are not supported! The nvcc flag '-allow-unsupported-compiler' can be used to override this version check; however, using an unsupported host compiler may cause compilation failure or incorrect run time execution. Use at your own risk.
這個錯誤是因為它不支援第 11 版以後的 gcc 編譯器,解決方法是改用 gcc-11 與 g++-11 編譯器:
# 安裝 gcc-11 與 g++-11 編譯器
sudo apt install gcc-11 g++-11

# 設定使用的編譯器
export CC=gcc-11
export CXX=g++-11

# 重新安裝 tiny-cuda-nn
pip install ninja git+https://github.com/NVlabs/tiny-cuda-nn/#subdirectory=bindings/torch
另外一個可能出現的錯誤是新版的 glibc 與舊版的 CUDA Toolkit 標頭定義衝突:
/usr/include/x86_64-linux-gnu/bits/mathcalls.h(83): error: exception specification is incompatible with that of previous function "cospi"
/home/gtwang/miniconda3/envs/nerfstudio/include/crt/math_functions.h(5551): here

/usr/include/x86_64-linux-gnu/bits/mathcalls.h(85): error: exception specification is incompatible with that of previous function "sinpi"
/home/gtwang/miniconda3/envs/nerfstudio/include/crt/math_functions.h(5439): here

/usr/include/x86_64-linux-gnu/bits/mathcalls.h(206): error: exception specification is incompatible with that of previous function "rsqrt"
/home/gtwang/miniconda3/envs/nerfstudio/include/crt/math_functions.h(774): here

/usr/include/x86_64-linux-gnu/bits/mathcalls.h(83): error: exception specification is incompatible with that of previous function "cospif"
/home/gtwang/miniconda3/envs/nerfstudio/include/crt/math_functions.h(5603): here

/usr/include/x86_64-linux-gnu/bits/mathcalls.h(85): error: exception specification is incompatible with that of previous function "sinpif"
/home/gtwang/miniconda3/envs/nerfstudio/include/crt/math_functions.h(5499): here

/usr/include/x86_64-linux-gnu/bits/mathcalls.h(206): error: exception specification is incompatible with that of previous function "rsqrtf"
/home/gtwang/miniconda3/envs/nerfstudio/include/crt/math_functions.h(844): here
參考 NVIDIA 論壇 的修補,將出現錯誤的這幾行加上 noexcept (true),以下是 patch 檔案:
774c774
< extern __DEVICE_FUNCTIONS_DECL__ __device_builtin__ double                 rsqrt(double x);
---
> extern __DEVICE_FUNCTIONS_DECL__ __device_builtin__ double                 rsqrt(double x) noexcept (true);
844c844
< extern __DEVICE_FUNCTIONS_DECL__ __device_builtin__ float                  rsqrtf(float x);
---
> extern __DEVICE_FUNCTIONS_DECL__ __device_builtin__ float                  rsqrtf(float x) noexcept (true);
5439c5439
< extern __DEVICE_FUNCTIONS_DECL__ __device_builtin__ double                 sinpi(double x);
---
> extern __DEVICE_FUNCTIONS_DECL__ __device_builtin__ double                 sinpi(double x) noexcept (true);
5499c5499
< extern __DEVICE_FUNCTIONS_DECL__ __device_builtin__ float                  sinpif(float x);
---
> extern __DEVICE_FUNCTIONS_DECL__ __device_builtin__ float                  sinpif(float x) noexcept (true);
5551c5551
< extern __DEVICE_FUNCTIONS_DECL__ __device_builtin__ double                 cospi(double x);
---
> extern __DEVICE_FUNCTIONS_DECL__ __device_builtin__ double                 cospi(double x) noexcept (true);
5603c5603
< extern __DEVICE_FUNCTIONS_DECL__ __device_builtin__ float                  cospif(float x);
---
> extern __DEVICE_FUNCTIONS_DECL__ __device_builtin__ float                  cospif(float x) noexcept (true);
將上面這份修補內容儲存為 noexcept_20260805.patch,然後執行以下指令進行修補:
# 自行修補編譯問題
patch --backup /home/gtwang/miniconda3/envs/nerfstudio/include/crt/math_functions.h < noexcept_20260805.patch
修補之後,舊版本的 math_functions.h 會在放原目錄之下的 math_functions.h.orig。接著重新安裝 tiny-cuda-nn:
# 重新安裝 tiny-cuda-nn
pip install ninja git+https://github.com/NVlabs/tiny-cuda-nn/#subdirectory=bindings/torch
最後進行 nerfstudio 套件的安裝:
# 安裝 nerfstudio 套件
pip install nerfstudio
測試 Nerfstudio 的環境是否正常:
# 載入 Nerfstudio 的 Conda 環境
conda activate nerfstudio

# 測試 Nerfstudio 是否正常可執行
ns-train --help
安裝一些必要套件:
# 安裝必要套件
pip install \
    carla==0.9.15 \
    pygame==2.6.1 \
    pyproj==3.5.0 \
    pyrender==0.1.45

# 確認是否有安裝成功
python -c "import carla, pygame, pyproj, pyrender; print('OK')"
安裝 COLMAP 三維重建軟體
參考 COLMAP 官方文件安裝 COLMAP 三維重建軟體,在 Ubuntu Linux 中可用 apt 直接安裝,安裝時要一併安裝 libposelib 套件:
# 安裝 COLMAP
sudo apt install colmap libposelib
安裝完成後,執行 colmap 看看是否正常。
# 測試執行 colmap 指令
colmap -h

# 測試執行 colmap 視窗界面
colmap gui
建立 data_extraction Conda 環境
建立 data_extraction Conda 環境,這是最主要的執行環境。
# 建立 data_extraction 的 Conda 環境
conda create -n data_extraction python=3.10 -y
conda activate data_extraction

# 安裝必要套件
pip install -U pip setuptools wheel
pip install -r data_extraction_requirements.txt
安裝 OpenMMLab 相關套件:
# 安裝 OpenMMLab 相關套件
conda activate data_extraction
pip install -U openmim
mim install mmengine
mim install mmcv==2.1.0
mim install mmdet==3.2.0
mim install mmdet3d==1.4.0
測試 OpenMMLab 相關套件是否安裝成功:
# 測試 OpenMMLab 相關套件是否安裝成功
python -c "import torch, mmcv, mmdet, mmdet3d; print('OK')"
建立 DAVE-2 自動駕駛模型 Conda 環境
建立 DAVE-2 自動駕駛模型 Conda 環境:
# 建立 DAVE-2 自動駕駛模型 Conda 環境
conda create -n dave_2 python=3.8 -y
conda activate dave_2

pip install -U pip setuptools wheel
pip install tensorflow==2.13.1
pip install pillow
pip install opencv-python
下載必要檔案
在整套 Cam2Sim 處理流程中,有許多大型檔案要額外下載。
預先訓練的 3D 偵測模型
這裡需要下載 FCOS3D(約 1 GB)與 PointPillars(約 20 MB)這兩個預先訓練的 3D 偵測模型,放在 2_process_datasets/utils/ 目錄之下:
conda activate data_extraction
pip install -U gdown

cd 2_process_datasets/utils

# 下載 FCOS3D 模型
gdown 1JIKRFQQI9CmQARk21Q619TPkdS49Voel -O fcos3d.pth

# 下載 PointPillars 模型
gdown 1AGOR8C0tDUsWSSWTEc0fA7kysIE9-iol -O hv_pointpillars_secfpn_6x8_160e_kitti-3d-3class_20220301_150306-37dc2420.pth

cd ../..
確認 FCOS3D 與 PointPillars 兩個模型都有正確下載:
# 確認 FCOS3D 與 PointPillars 兩個模型都有正確下載
ls -lh 2_process_datasets/utils/fcos3d.pth \
       2_process_datasets/utils/hv_pointpillars_secfpn_6x8_160e_kitti-3d-3class_20220301_150306-37dc2420.pth
DAVE-2 模型參數
下載 DAVE-2 模型參數(約 50 MB),放在 system_under_test/ 目錄之下:
conda activate data_extraction
cd system_under_test

# 下載 DAVE-2 模型參數
gdown 1_pJHuvU4386FOYrF_B0ETIZGmShObhIF -O final.h5

cd ..
確認 DAVE-2 模型參數有正確下載:
# 確認 DAVE-2 模型參數有正確下載
ls -lh system_under_test/final.h5
步驟一:從 ROS Bag 抽取資料
這個步驟會從 data/raw_ros_data/reference_bag.bag 這一個 ROS bag 檔案中抽取資料,首先下載官方的 ROS bag 範例資料:
conda activate data_extraction
pip install -U gdown

# 下載官方的 ROS bag 範例資料
gdown 1ijhejhNO19jvrb3BUkEKRlxw-SkfZRhu -O data/raw_ros_data/reference_bag.bag
確認 ROS bag 範例資料有正確下載:
# 確認 ROS bag 範例資料有正確下載
ls -lh data/raw_ros_data/reference_bag.bag
執行步驟一,從 ROS bag 抽取資料:
# 步驟一:從 ROS bag 抽取資料
conda activate data_extraction
bash 1_extract_ROS_data/step1.sh
step1.sh 會依序執行以下步驟,從 ROS bag 抽取出各種資料:
1A_camera_with_odometry.py:抽取出 RGB 攝影機的每一幀影像與後軸里程計(rear-axle odometry)的 UTM 坐標系姿態,透過內插法計算每一幀影像對應的 UTM 坐標系姿態,輸出影像(images/frame_*.png)與對應的 UTM 坐標系姿態(images_positions.txt)。1B_lidar_with_odometry.py:抽取出光達(LiDAR)點雲資料與里程計的 UTM 坐標系姿態,透過內插法計算每一幀點雲對應的 UTM 坐標系姿態,輸出點雲資料(point_clouds/point_cloud_*.bin)與對應的 UTM 坐標系姿態(lidar_positions.txt)。1C_poses_and_trajectory.py:抽取出里程計的詳細資料,輸出完整的 UTM 坐標系姿態(odometry.csv)與軌跡資料(trajectory.csv)。1D_steering_status.py:抽取出車輛轉向值並輸出至檔案(steering_pct.txt)。1E_model_output.py:抽取出駕駛模型轉向預測資料至檔案(steering_predictions.txt)。
執行完之後,輸出的資料會放在 data/raw_dataset/reference_bag/ 目錄之下。
# 確認輸出檔案
tree -L1 data/raw_dataset/reference_bag/
data/raw_dataset/reference_bag/
├── images
├── images_positions.txt
├── images.zip
├── lidar_positions.txt
├── odometry.csv
├── point_clouds
├── steering_pct.txt
├── steering_predictions.txt
└── trajectory.csv

3 directories, 7 files
步驟二:處理從 ROS Bag 取出的資料
這個步驟會將步驟一產出的資料,做進一步的處理:
- 從攝影機影像與光達資料,計算路邊停放車輛的 3D 邊界框(bounding box)。
- 以 OpenStreetMap 為基礎,產生對應實際實驗場域的地圖。
- 高斯潑濺(Gaussian Splatting)訓練用的重疊影像分割(overlapping image splits)。
這裡會需要預先訓練好的 FCOS3D 與 PointPillars 模型,在上面的安裝過程已經將需要的模型檔案放在 2_process_datasets/utils/ 目錄之下。
執行步驟二,處理從 ROS bag 取出的資料:
# 步驟二:處理從 ROS Bag 取出的資料
conda activate data_extraction
bash 2_process_datasets/step2.sh
step2.sh 會依序執行以下步驟,處理從 ROS bag 取出的資料:
2A_camera_parked_cars_detection.py:使用攝影機影像與 FCOS3D 模型偵測路邊停放車輛。2B_lidar_parked_cars_detection.py:使用光達點雲資料與 PointPillars 模型偵測路邊停放車輛。2C_create_map_from_coordinates_auto.py:下載 OpenStreetMap 地圖資料,產生對應實際實驗場域的地圖資料。2E_prepare_dataset_for_gaussian_splatting.py:切除攝影機底部無效範圍,使用 SegFormer 模型產生天空遮罩,產生高斯潑濺訓練用的重疊影像分割。2F_extract_semantic_maps.py:使用 SegFormer 將 RGB 的攝影機影像分割為道路(road)、車輛(car)與背景(background),後續提供給步驟 6B 進行語意 IoU 評估。2G_OPT_fix_sidewalk.sh:修正地圖中的人行道,這是選擇性的步驟。
執行時可能會出現以下錯誤:
[Open3D WARNING] GLFW Error: Wayland: The platform does not support setting the window position
[Open3D WARNING] Failed to initialize GLEW.
根據 Open3D 的 Issue #5126 的解法,強迫 Open3D 使用 XWayland(模擬 X11):
# 強迫 Open3D 使用 XWayland
export XDG_SESSION_TYPE=x11
export GDK_BACKEND=x11

# 重新執行步驟二:處理從 ROS Bag 取出的資料
conda activate data_extraction
bash 2_process_datasets/step2.sh
執行時會跳出 Open3D 的視窗,顯示點雲資料以及 PointPillars 模型偵測的結果。
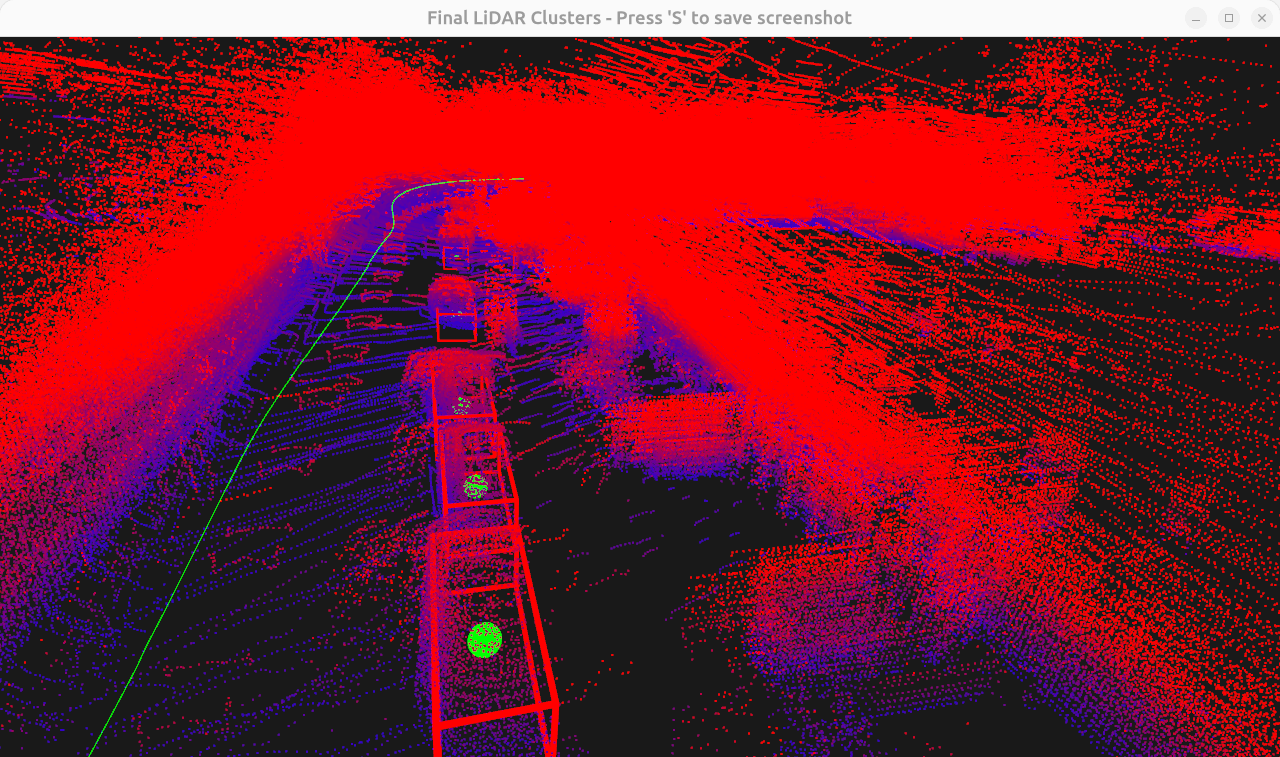
點雲資料以及 PointPillars 模型偵測的結果
step2.sh 預設會使用標準的 PointPillars 模型,如果希望可以手動調整偵測結果,可以加上 --refinement 參數,這會讓指令稿在執行時將原本的 2B_lidar_parked_cars_detection.py 替換為 2B_OPTIONAL_lidar_parked_cars_detection_with_refinement.py:
# 手動調整偵測結果
bash 2_process_datasets/step2.sh --refinement
步驟三:產生 CARLA 模擬用資料
這個步驟會產生 CARLA 模擬需要的資料,設定好 CARLA 模擬環境。
這裡大部分的必要資料都是從步驟一與步驟二產生的,唯一需要注意的只有攝影機的設定資料,其檔案放在 data/data_for_carla/reference_bag/camera.json,官方已經將適用於 reference_bag 範例的攝影機的設定資料預先放在套件庫之內,所以如果只是跑官方的範例,就不需要另外準備這個檔案,但是如果要跑自己的 ROS bag 檔案,就要仿照這個檔案的格式,根據自己的攝影機設定來準備這份設定檔。
執行步驟三,產生 CARLA 模擬用資料:
# 步驟三:產生 CARLA 模擬用資料
conda activate data_extraction
bash 3_generate_simulation_data/step3.sh
step3.sh 會依序執行以下步驟:
3A_transform_coordinates_to_carla.py:將車輛軌跡資料轉換為 CARLA 座標並輸出 JSON 檔案。3B_transform_parked_vehicles_to_carla.py:將偵測到的路邊停放車輛中心點位置轉換為 CARLA/OpenDRIVE 座標,並輸出 JSON 檔案。3C_setup_carla.py:依據3_generate_simulation_data/utils/config.py的CARLA_INSTALLATION_PATH設定,啟動 CARLA 模擬環境。3F_generate_carla_scenario.py:設定 CARLA 環境,載入 OpenDRIVE 地圖、hero 車輛、路邊停放車輛。
執行之後,就會執行 CARLA 顯示設定好的模擬環境。
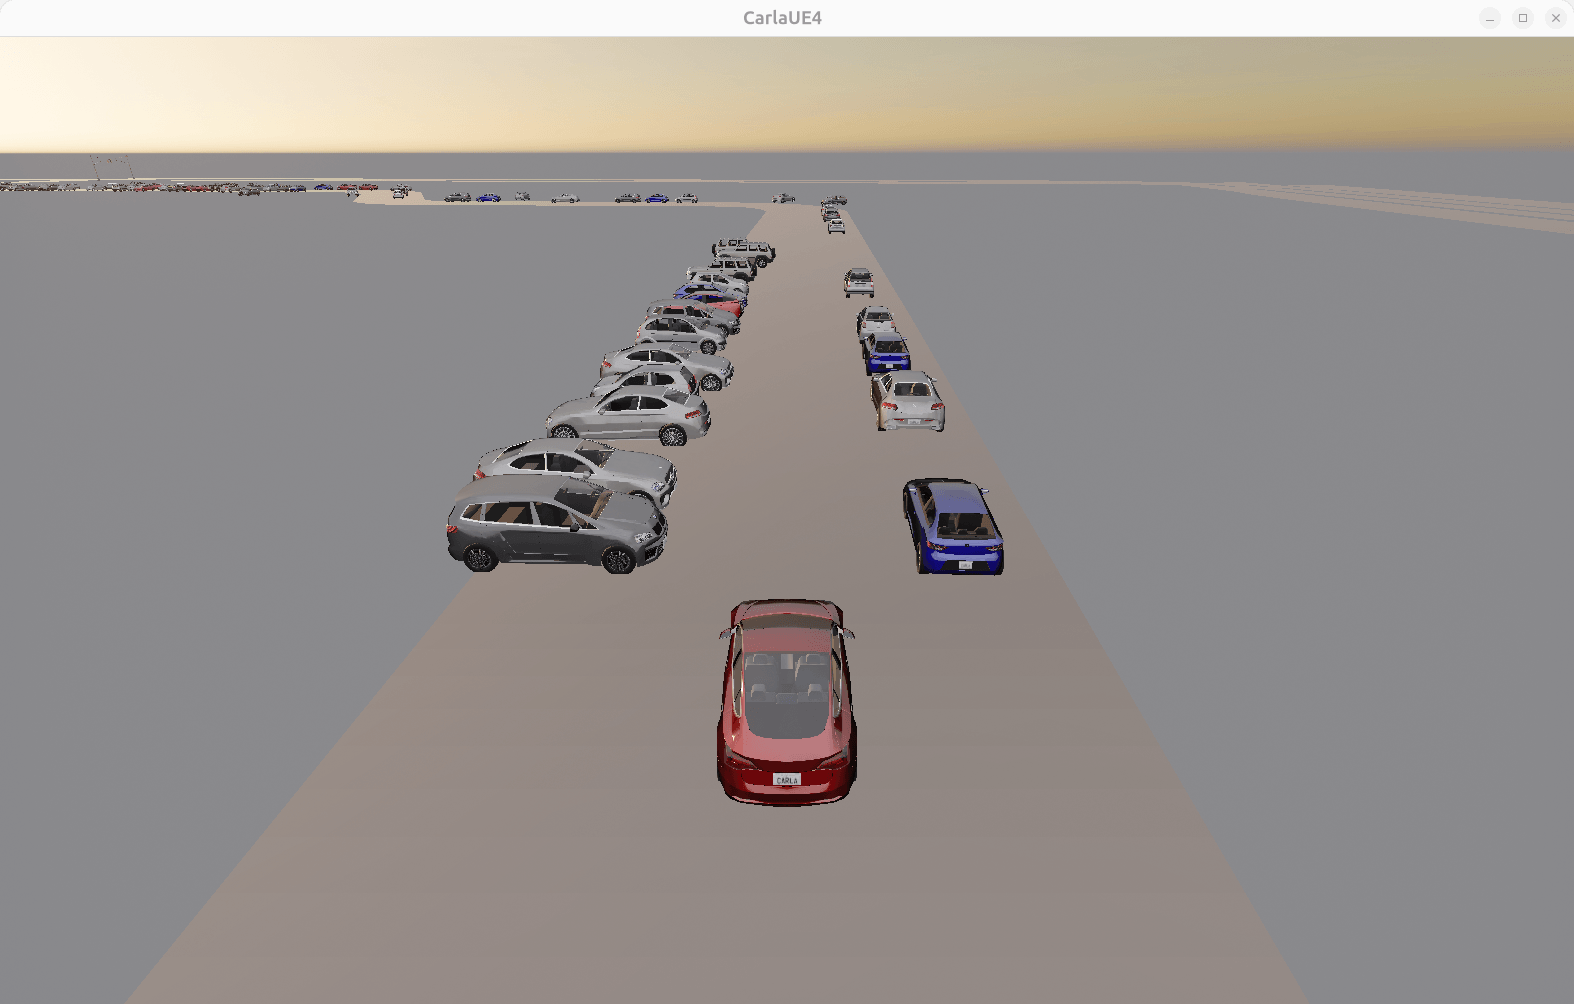
CARLA 模擬環境
步驟四:準備高斯潑濺(Gaussian Splatting)用資料
這一步要產生高斯潑濺所需要的資料,可分為兩個子步驟:
- 使用 COLMAP 針對每一個分割,各重建一個 space 模型。
- 針對每一個分割進行 Splatfacto 模型訓練,並且進行 UTM 與 Nerfstudio 之間的座標轉換。
1. 手動以 COLMAP 對每一個分割(split)進行重建
在執行步驟二的 2E_prepare_dataset_for_gaussian_splatting.py 之後,會在 data/data_for_gaussian_splatting/<BAG_NAME>/ 目錄下產生高斯潑濺訓練用的重疊影像分割資料,以範例的 reference_bag 來說,產生的資料會像這樣:
# 查看高斯潑濺訓練用的重疊影像分割資料
ls -d data/data_for_gaussian_splatting/reference_bag/{images_gs_split,sky_masks_gs_split}*
data/data_for_gaussian_splatting/reference_bag/images_gs_split_1_1_of_2
data/data_for_gaussian_splatting/reference_bag/images_gs_split_2_1_of_2
data/data_for_gaussian_splatting/reference_bag/images_gs_split_3_1_of_2
data/data_for_gaussian_splatting/reference_bag/sky_masks_gs_split_1_1_of_2
data/data_for_gaussian_splatting/reference_bag/sky_masks_gs_split_2_1_of_2
data/data_for_gaussian_splatting/reference_bag/sky_masks_gs_split_3_1_of_2
對於每一個分割(split)都要各跑一次 COLMAP。首先開啟 COLMAP:
# 啟動 COLMAP GUI
colmap gui
選擇主選單「File」中的「New Project」新增專案,Images 選擇一個分割影像目錄,而 Database 的路徑可以自由選擇,建議放在對應的路徑下,例如:
- Database:
/home/gtwang/cam2sim/data/data_for_gaussian_splatting/reference_bag/colmap/split_1/db.db - Images:
/home/gtwang/cam2sim/data/data_for_gaussian_splatting/reference_bag/images_gs_split_1_1_of_2
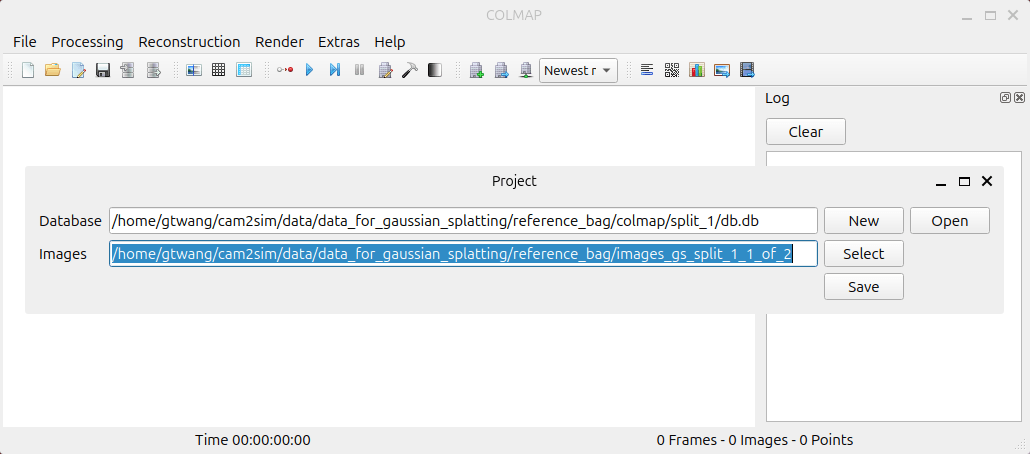
COLMAP 新增專案
選擇「Processing」中的「Feature extraction」,填入以下資訊:
- 相機模式選擇「OPENCV」。
- 勾選「Shared for all images」。
- 選擇「Custom parameters」,填入參數:
785.34926249, 784.07587341, 406.50794975, 249.45341029, -0.42020115, 0.64296938, -0.00531934, -0.00215015。 - 「mask_path」選擇對應的天空遮罩:
/home/gtwang/cam2sim/data/data_for_gaussian_splatting/reference_bag/sky_masks_gs_split_1_1_of_2。
按下「Extract」進行特徵萃取。
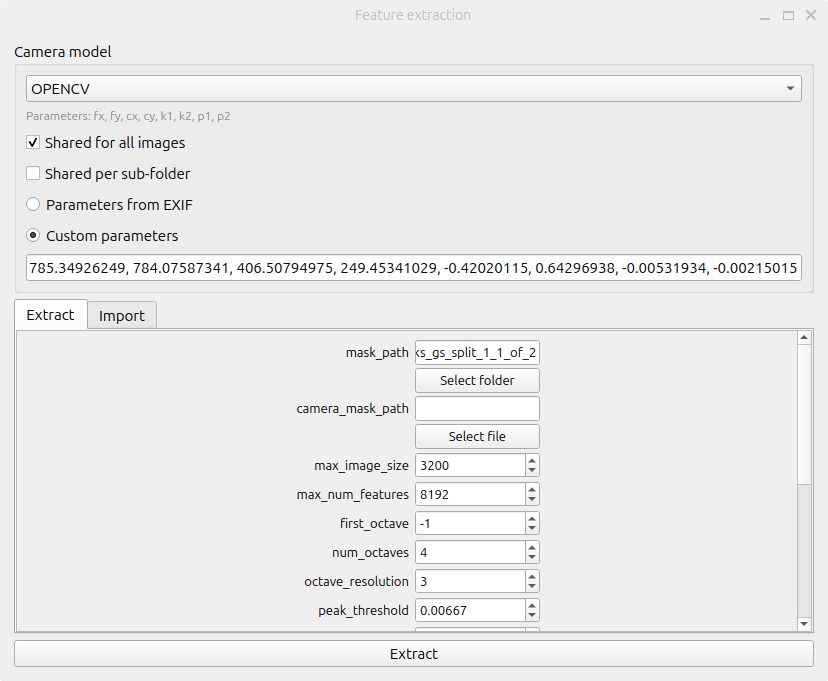
COLMAP 特徵萃取
選擇「Processing」中的「Feature matching」,選擇「Sequential」的方式,「overlap」值設定為 10,按下「Run」進行特徵匹配。
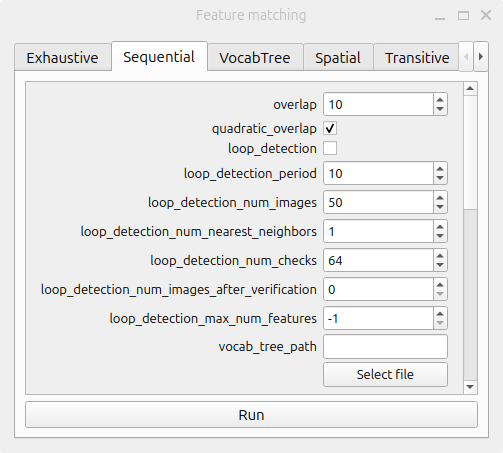
COLMAP 特徵匹配
選擇「Reconstruction」中的「Reconstruction options」,選擇「Bundle」頁籤,將以下選項取消勾選,固定校準的相機參數:
refine_focal_lengthrefine_principal_pointrefine_extra_parameters
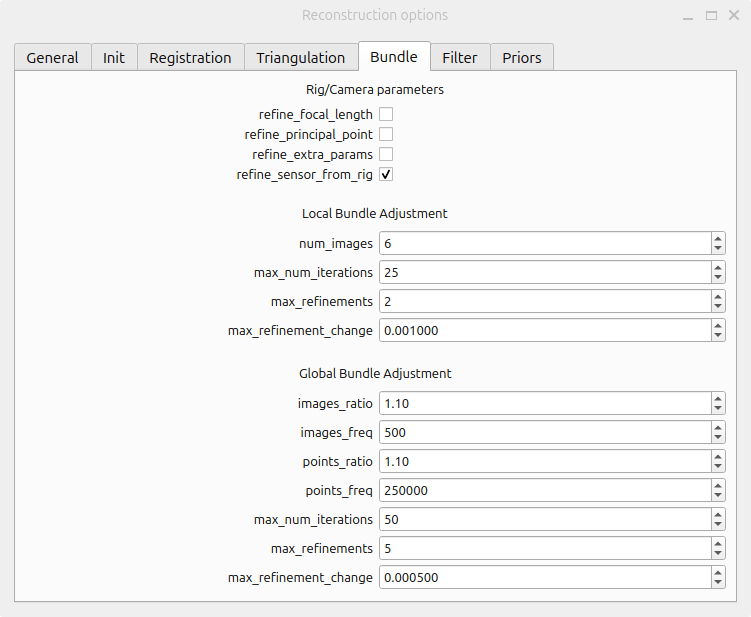
COLMAP 的 Reconstruction options
選擇「Reconstruction」中的「Start reconstruction」,進行重建。等 COLMAP 重建完成後,就會出現重建好的 sparse 模型。
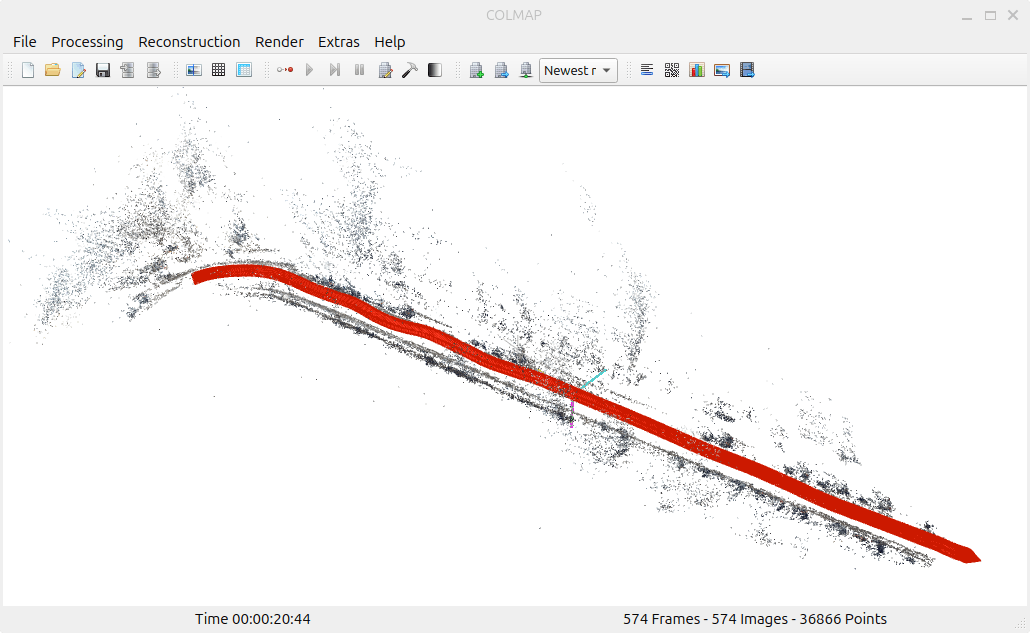
COLMAP 建立 sparse 模型
將重建好的 sparse 模型匯出至步驟 2E 建立好的目錄中:
- split_1:
/home/gtwang/cam2sim/data/data_for_gaussian_splatting/reference_bag/colmap/split_1/sparse/0 - split_2:
/home/gtwang/cam2sim/data/data_for_gaussian_splatting/reference_bag/colmap/split_2/sparse/0 - split_3:
/home/gtwang/cam2sim/data/data_for_gaussian_splatting/reference_bag/colmap/split_3/sparse/0
模型匯出之後,目錄中都會包含以下幾個 bin 檔案:
cameras.binimages.binpoints3D.bin
針對每一筆分割資料都用 COLMAP 做一次重建。
2. Splatfacto 模型訓練與 UTM 對齊
當每一筆分割資料都用 COLMAP 做完 sparse 重建之後,就可以進行 Splatfacto 模型訓練,並進行 UTM 與 Nerfstudio 之間的座標轉換。
# Splatfacto 模型訓練
conda activate nerfstudio
bash 4_gaussian_splatting_preparation/4B_train_gaussian_splatting.sh
這行指令會執行以下動作:
- 呼叫
ns-train splatfacto針對 COLMAP 重建的 sparse 模型與對應的影像、天空遮罩進行 Splatfacto 模型訓練。 - 執行
4C_utm_yaw_to_nerfstudio.py進行 UTM 與 Nerfstudio 之間的座標轉換,將轉換結果儲存至utm_to_nerfstudio_transform.json。
4B_train_gaussian_splatting.sh 在執行時會檢查各個分割資料是否已經完成訓練(checkpoint 是否 ≥29000 steps),自動跳過已完成的部份。另外也會檢查每個分割的 utm_to_nerfstudio_transform.json 有沒有正常產生,若這個檔案不存在,也會自動重新進行座標轉換,產生該檔案。
執行完成後,確認座標轉換資料有正常產生:
# 確認 alignment files 有正確產生
find data/data_for_gaussian_splatting/reference_bag/outputs -name "utm_to_nerfstudio_transform.json"
步驟五:執行模擬
這一步將進行實際的駕駛模擬,這裡有四種不同的模式,對應不同的問題:
- 5A:在 CARLA 中撥放車輛行駛軌跡,確認資料用。(沒有高斯潑濺、DAVE-2)
- 5B:在 CARLA 中以 RGB 影像搭配 DAVE-2 進行閉環自動駕駛模擬。
- 5C:在 CARLA 中撥放車輛行駛軌跡,顯示 CARLA 模擬畫面與高斯潑濺實景重建畫面。
- 5D:在 CARLA 中以高斯潑濺實景重建畫面搭配 DAVE-2 進行閉環自動駕駛模擬,這是這個專案中最主要的模擬模式。
使用者可根據自己的需求選擇要使用哪一些模式進行模擬。
# 步驟五:執行模擬
bash 5_execute_simulation/step5.sh --mode 5A
bash 5_execute_simulation/step5.sh --mode 5B
bash 5_execute_simulation/step5.sh --mode 5C
bash 5_execute_simulation/step5.sh --mode 5D
step5.sh 在執行時,會依序執行以下動作:
3C_setup_carla.py:啟動 CARLA 模擬環境,傾聽 2000 連接埠。3F_generate_carla_scenario.py:設定 CARLA 環境,載入 OpenDRIVE 地圖、hero 車輛、路邊停放車輛。system_under_test/communicator.py:啟動 DAVE-2 伺服器,傾聽 5090 連接埠。(只有 5B 與 5D 需要)- 執行對應模式的指令稿。
以下是 5C 模式的模擬畫面。
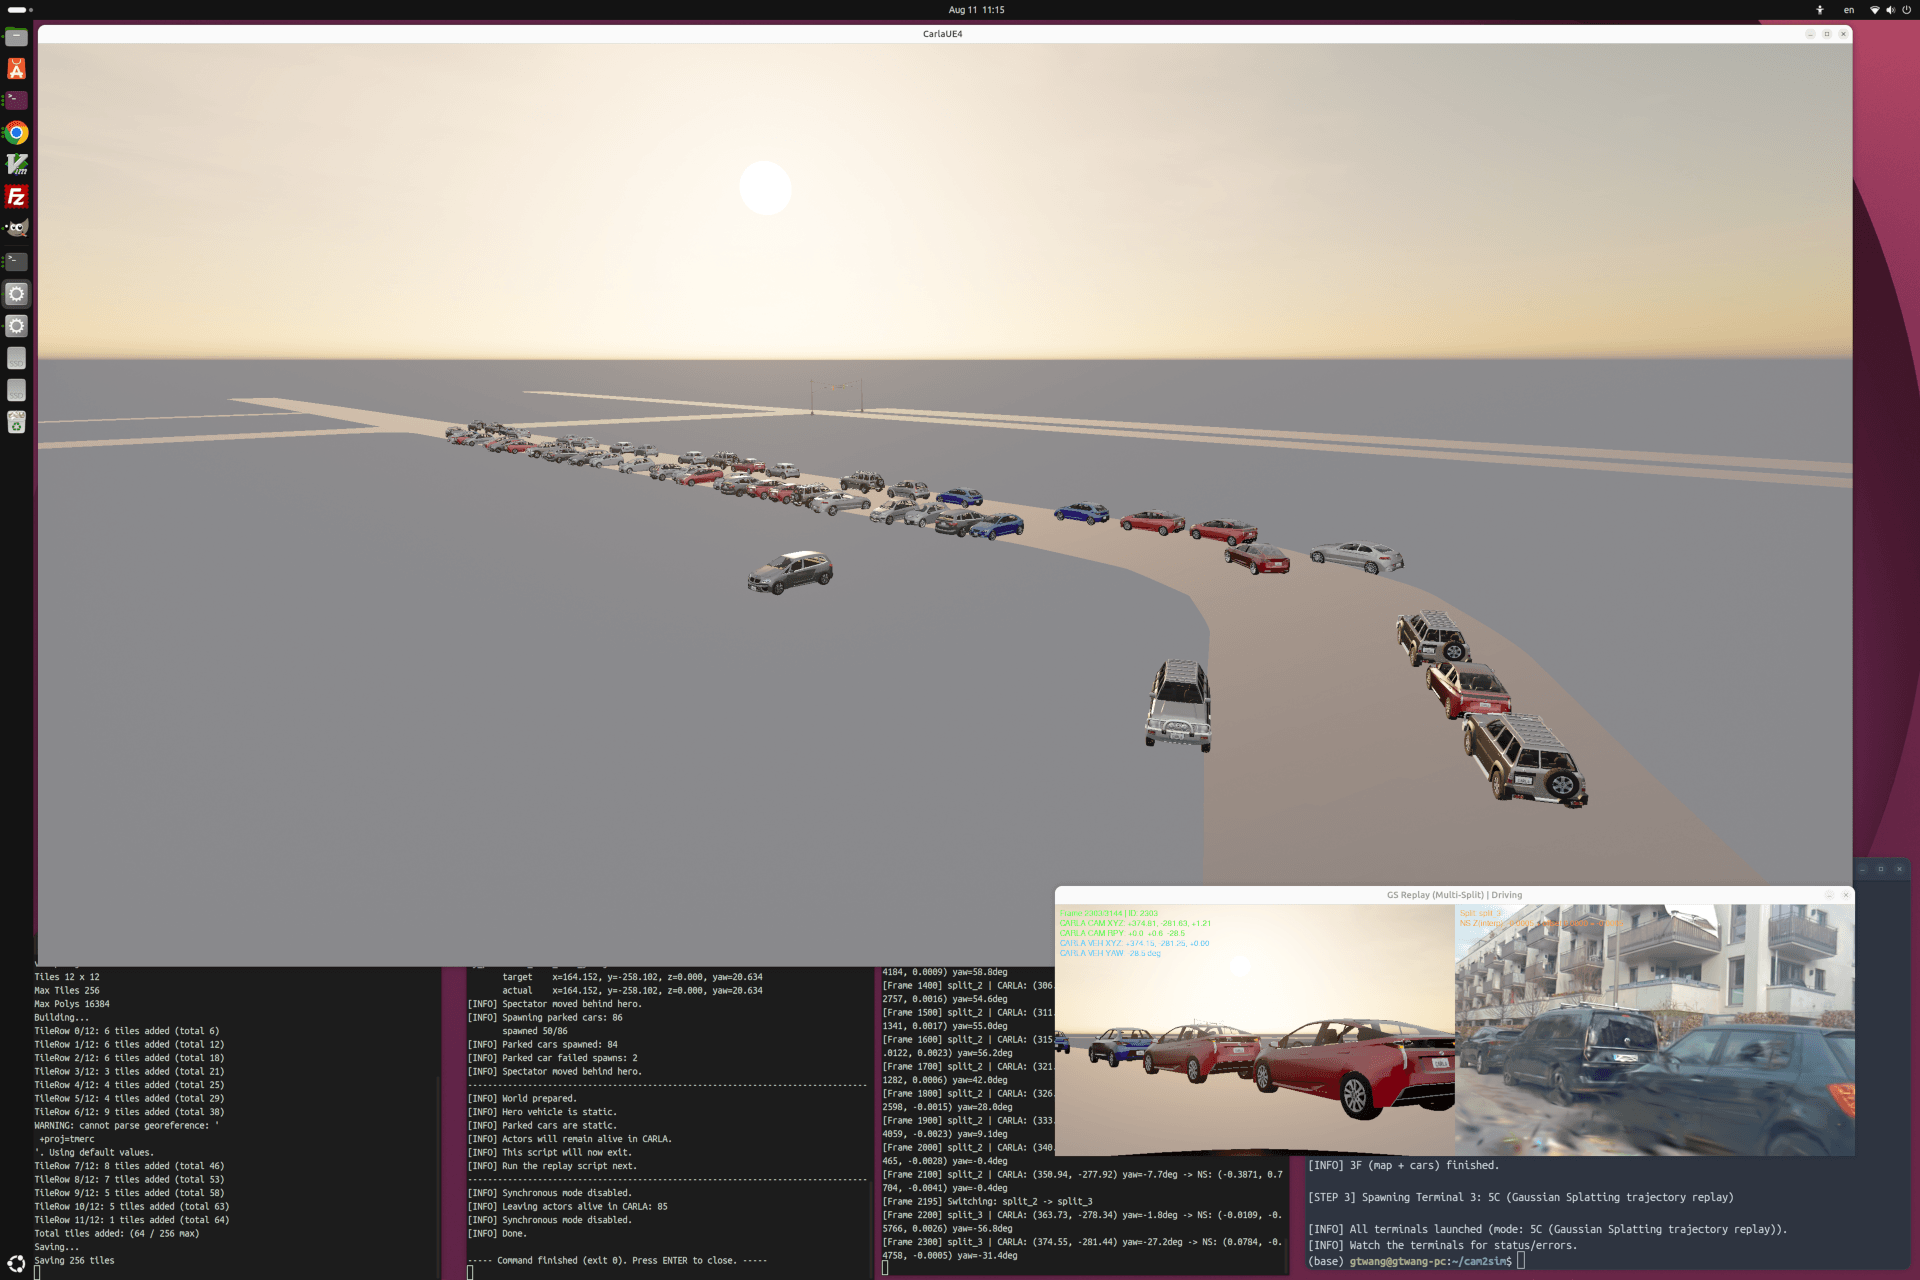
Cam2Sim 5C 模式模擬畫面
步驟六:驗證模擬結果
這一步會驗證模擬的結果與真實世界的差異。
- 6A:將車輛與語意地圖放進驗證用目錄
data/data_for_validation/。 - 6B:計算 SegFormer 的真實答案與 CARLA 地圖的 IoU,評估畫面擬真度。
- 6C:駕駛品質指標,包含 Min-Frechet,、corridor violation、steering jitter,評估閉環自動駕駛擬真度。
# 6A:將車輛與語意地圖放進驗證用目錄
python 6_validation/6A_copy_data_for_validation.py

# 6B:評估畫面擬真度
python 6_validation/6B_semantic_map_comparision.py

# 6C:評估閉環自動駕駛擬真度
cp data/processed_dataset/reference_bag/scenario_segment/scenario_segment.json \
   data/data_for_validation/real_world_trajectories/scenario_segment.json

python 6_validation/6C_driving_quality_metrics.py \
    --map_xodr data/processed_dataset/reference_bag/maps/map.xodr \
    --segment data/data_for_validation/real_world_trajectories/scenario_segment.json \
    --rw_dir  data/data_for_validation/real_world_trajectories \
    --sim_dirs GS=data/data_for_validation/GS_trajectories